
Non-destructive testing is an effective technique that allows testers to collect data about a product without damaging the product. It is used to check product defects and damage inside objects without disassembling or breaking them.
Non-destructive testing (NDT) is synonymous with non-destructive testing (NDI) which is testing an object without causing damage. In other words, NDT is used for non-destructive testing, while NDI is used for pass/fail testing.
Japanese Industrial Standard (JIS) Z 2300 defines Non-Destructive Testing as “Testing to determine the presence or absence of defects, location, size, shape, state of distribution, etc. without destroying the material or product”. And non-destructive testing is defined as “an evaluation based on the results of non-destructive testing according to standards or criteria.
However, in some cases, non-destructive testing is used similar to NDT. Since the nondestructive testing methods in this section also include NDT, we recommend separating their uses depending on your application and purpose.
The two most common NDT purposes are:Quality assessment:Checking for problems with manufactured products and parts. For example, it is used to check shrinkage holes during molding, welding defects, etc. Lifetime assessment: Confirms safe use during product operation. It is available to check for irregularities in structures and infrastructure that will be used for long periods of time.
Non-destructive testing provides safe and effective ways of testing objects as follows.
Non-destructive testing is particularly effective precisely because it can identify internal defects of an object without destroying them. This method is similar to X-ray inspection, revealing damaged parts that are difficult to detect on the outside.
NDT is available to test products before shipping as this method does not contaminate or damage them. This helps in ensuring the product is tested better in all testing activities, increasing product reliability. However, in some NDT cases, you may require multiple preparation procedures that are relatively expensive.
There are several techniques used in non-destructive testing and they vary in severity depending on the defects or materials being tested.
| Internal defect | RT : Radiographic examination |
|---|---|
| UT: Ultrasound examination | |
| Surface defects ET: Electromagnetic (eddy current) test | ET: Electromagnetic (eddy current) test |
| MT: Magnetic particle test | |
| Surface open defect | PT: Penetration testing |
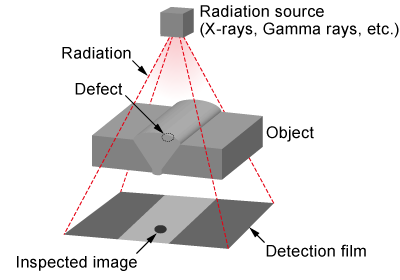
Radiographic (RT) testing uses X-rays and gamma rays on objects. RT detects defects using thickness differences in images from various angles. Computed tomography (CT) is one of the industrial NDT imaging methods that can provide cross-sectional and 3D images of objects during inspection. This feature allows detailed analysis of internal defects or thickness. It is suitable for measuring the thickness of steel plates and surveying the interiors of buildings.
Although NDT is beneficial, several things must be considered before treating the system: Extreme caution should be exercised when using radiation.
RT is used to analyze the inside of lithium-ion batteries and mounted electronic circuit boards. It is also available to detect defects of pipes and welds placed in power plants, factories and other buildings.

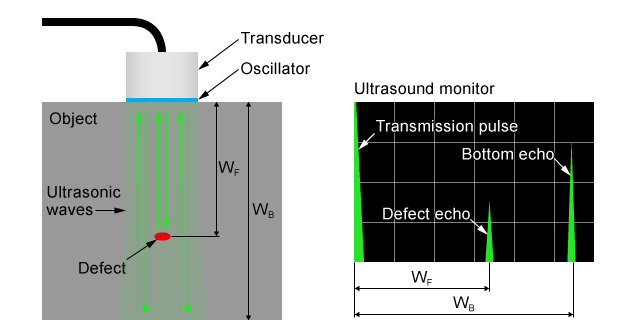
Ultrasonic testing (UT) uses ultrasonic waves on an object. Using the characteristics of ultrasonic waves reflecting off a material's boundary surface, UT examines the internal conditions of an object by measuring sound reflection. UT is commonly used in many industries as one of many Non-Destructive Tests that do not damage materials. It detects internal product defects and flaws within homogeneous materials, such as rolled products and materials.
The UT system is safe and easy to use but has the limitation of being difficult to inspect irregularly shaped materials. It is used to detect defects within products and inspect defects within homogeneous materials such as products and rolling materials.

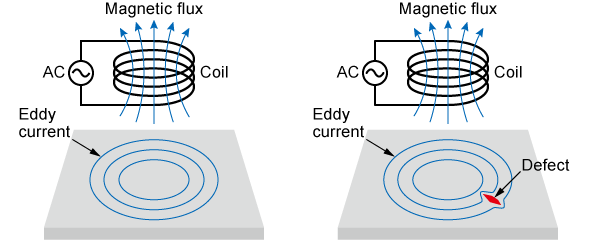
In Eddy Current (Electromagnetic) Testing (ET), a coil carrying an alternating current is placed tightly on the surface of an object. The current in the coil creates circulating eddy currents in the object near the surface according to the phenomenon of electromagnetic induction. Then, defects such as cracks on the surface will be measured. ET is one of the most popular NDT methods, easily used in automated testing because it requires no pre-processing or post-processing. It is suitable for thickness measurement and construction surveying and is commonly used in manufacturing facilities.
However, ET is available in probes in conductive materials.

Magnetic particle testing (MT) is used to detect defects just below the material surface in a testing solution containing magnetic powder. An electric current is applied to the object to test it by changing the magnetic powder pattern on the object's surface. When the current encounters a defect there, it will create a magnetic flux leakage field where the defect is located.
It is used to detect shallow/small surface cracks and it is available for aircraft, automobile and railway parts.
Penetrating testing (PT) refers to a process using capillary phenomena in which a penetrant is used to coat an object and fill the inside of a defect.
After this process, the surface penetrant will be removed.
The penetrant that has entered the defect cannot be washed away and remains, so by feeding the developer, the defect will be absorbed and clearly visible. PT is only suitable for examining surface defects. It requires longer processes and longer completion times, which are not suitable for internal testing.
It is used to test turbine blades of jet engines and automobile parts.
Learn about coating thickness measuring devices
The hammer check system was handled normally by the operator performing the hammer and checking the internal condition audibly. It uses the same principle as a whole teacup makes a clear sound when struck, but a cracked teacup produces a dull sound. This test method is also used to check the looseness of bolts, check railway shafts and exterior walls of buildings.
Visual inspection is one of the easiest and simplest non-destructive testing methods. The visual appearance of objects is inspected by staff.
Non-destructive testing helps improve the safety and security of industrial plants by providing advantages in quality control of castings, forgings, rolled products, pipes, welding processes, etc. It also brings better life reliability by maintaining transportation infrastructure such as bridges, tunnels, railway wheels and axles, aircraft, ships, transport vehicles… and inspection facilities. living infrastructure such as turbines, pipes, and tanks in power plants.
Furthermore, technical NDT will become more important for advances in non-industrial situations such as surveying cultural assets, art objects, fruit classification, and thermometer testing.